The way to Properly Remanufacture Your HOURSE POWER Q1338A-Q1339A Black Toner Ink cartridge In Just 53 Easy Steps
Hewlett Packard’s LaserJet 4200 and the LaserJet 4300 series of laser printers were first released in December 2002. They were equally designed to replace the now-concluded Hewlett Packard 4100 LaserJet printer.
Based on a new printer engine, the 4200 in addition to 4300 series, have more incredible print speeds of 30 ppm (pages per minute) for the 4200 and 1 out of 3 ppm (pages per minute) for the 4300 with a superior first page out the time frame of less than nine just a few seconds.
Wow, that is pretty rapidly at a starting cost of about $1 000 for the basic model 4200 and $1 399 for the base unit 4300. These new machines are priced at the exact cost because of the Hewlett Packard 4100 LaserJet printer.
There are differences in the detailed molding of the cartridges, which usually prevent them from being interchangeable. One noteworthy difference is in the design of the specific toner hopper.
The toner hopper on the HP 4300 is more significant and keeps 1 050 grams of toner for an estimated webpage yield. This will roughly perform 18 000 web pages @ 5% coverage.
The small toner hopper on the HORSEPOWER 4200 holds only 690 grams of toner and yields approximately 12 000 pages @ 5% insurance coverage. Another notable difference with the waste section. The waste material hopper of the HP 4300 is more significant for holding the excess waste produced by the higher load weight.
The HP 4200 waste hopper also has a con el fin sticking up on the left-hand side of the hopper that helps prevent the cartridge from installing into the HP 4300 LaserJet printer.
Because the 4200 and the 4300 utilize the same print engine, the constituents that make up the cartridges are identical.
The cartridge chips situated on the top right side in the waste hopper, however, are usually in indeed different. A slight difference in programming prevents one particular chip from being used for both cartridges, so it’s essential to utilize the correct chip when remanufacturing the cartridge.
Though the processor chip is physically different than those of the HP 4100, the knowledge that the chip contains is practically the same.
A few additional weapons like First Installed Date in addition to Last Date Used usually are one-stored chips. This information is displayed at the bottom of the Resources Status Page.
Just like the HORSEPOWER 4100, 4200, and 4300, all can be run along with a spent chip or devoid of any chip installed at all.
Various testing has shown that the processor chip can be rerun inside the printer that it was used in at first. Running the used processor chip causes a “Replace Cartridge” concept and the loss of the low toner warning.
Usage of often the chip in a machine in addition to the one it was previously roaming will result in a “Non-HP Cartridges Detected” message and the loss of all the information on the Supplies Reputation Page.
While running the particular cartridge without the chip, it will eventually result in a “10. 10. 00 Supplies Memory Error” if the cartridge is first installed.
Following pressing the Select key a “Non-HP Cartridge Discovered message will appear before the equipment goes to ready. All the information in the chip will not be obtainable and a “Warning” message is complete. You will find this on the Supplies Condition Page.
Here are you Do it yourself “How-to-Remanufacture” the HP Q1338A/Q1339 Instructions:
Let’s get straight to the point, no beating surrounding the bush during this lecture.
Initially, you will need the necessary Tools along with the Supplies Required:
Tools along with Supplies Required:
oDiagonal Termes conseillés (tool)
Phillips Head Electric screwdriver (tool)
oSmall Flat Incisor Screwdriver (tool)
Dremel Program with Cutting Bit (tool)
needle nose Pliers (tool)
padding Powder (supply)
soft Lint Free Cloth (supply)
anhydrous Isopropyl Alcohol (supply)
was (supply)
oToner (supply)
drum (supply)
expanding Memory foam (supply)
doctor Blade (supply)
wiper Blade (supply)
The following you will also be provided with the INDUSTRY (original equipment manufacturer) facts:
HP 4200:
oPart Variety: Q1338A
OEM Gram Basket full: 690 grams
yield enable-a 5% coverage: 12, 000 pages/min: 30
resolution: 300/600/1200dpi (dots every inch)
HP 4300:
oPart Number: Q1339A
OEM G Load: 1025 grams
yield @ 5% coverage: 20, 000 pages/minutes: 45
resolution: 300/600/1200dpi (dots per inch)
Below are the 53 easy steps to remanufacture your HP 4200/4300 LaserJet Q1338A/Q1339A toner carts.
Table of Contents
Step #1:
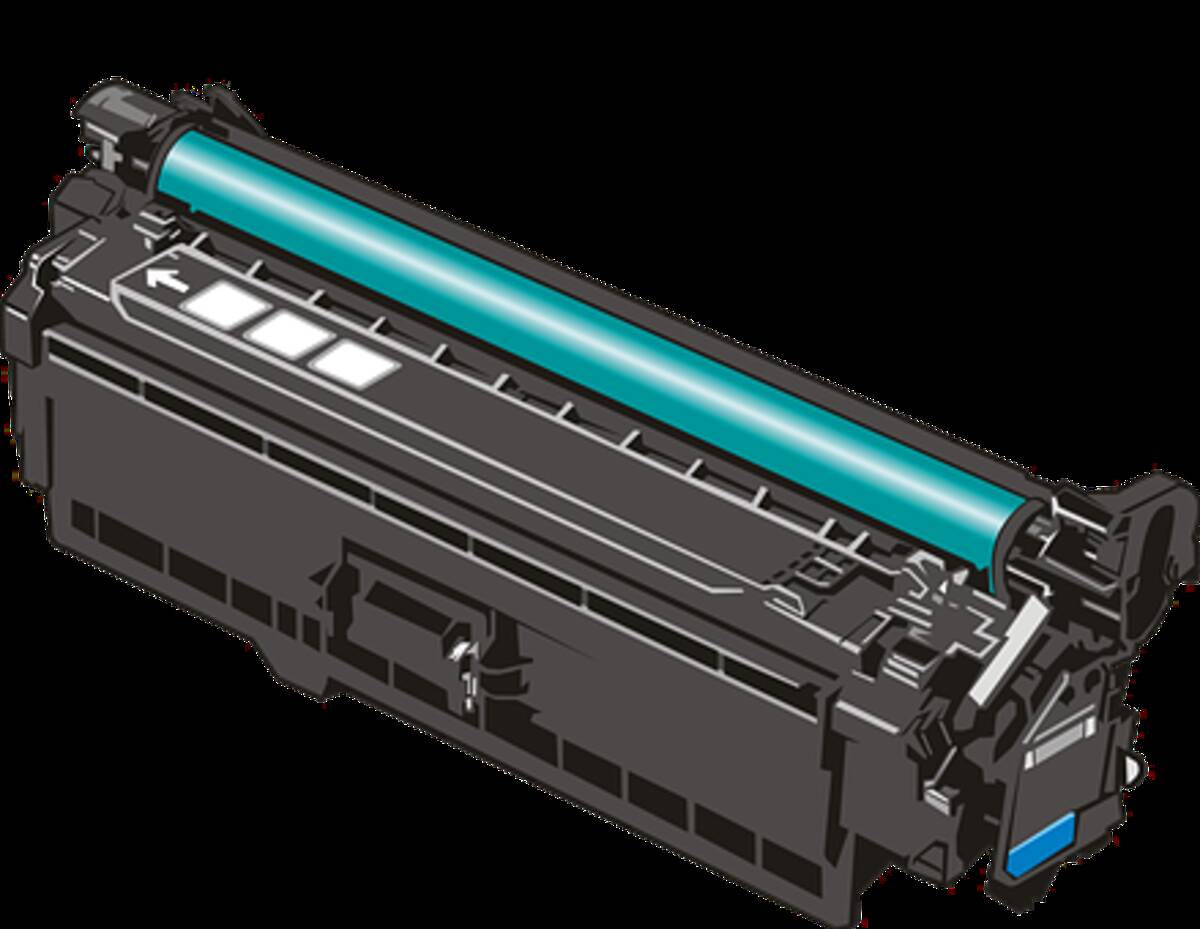
Place the particular cartridge on the worktable with all the drums facing upward and the drum shutter arm in your direction.
Step #2:
Using a tiny flat-blade screwdriver, discharge the clip that holds the carol shutter arm to the cartridges.
Step #3:
pull the particular shutter arm from the carol shutter and slide the particular shutter arm from it is positioning post.
Note: Tend not to lose the tension spring, most conveniently inside the drum shutter supply. Place the tension spring around the shutter arm.
Move #4:
Open the carol shutter exposing the carol. The drum shutter is keyed on the noncontact edge of the cartridge. Slide often the shutter bar back before the bar can be removed from the ink cartridge end cap.
Step #5:
pull the drum shutter release bar from the cartridge call end cap. Then you need to set the drum shutter release aside.
Step #6:
Next, remove the two screws positioning the cartridge cap into the cartridge.
Step #7:
Using a flat-blade screwdriver, pry the contact end limitation away from the toner hopper breaking the three plastic welds holding the end cap into the toner hopper. Afterward, it may help end caps.
Step #8:
using diagonal cutters, lower the three plastic welds to eliminate the contact end limit.
Step #9:
Simply move the cartridge 180 certifications. Carefully remove the four anchoring screws holding the gear housing ending cap.
Step #10:
While holding the opposite end in the cartridge, remove the gear assemblage end cap from the cartridge. Then you want to separate the two sections and set the toner hopper aside.
Step #11:
Remove the screw having the drum axle. And then remove the drum axle.
Phase #12:
Lift the melody by the small gear and pull the drum through the bearing hub.
Step #13:
Remove the PCR through the PCR saddles.
Note: If you want to reuse the PCR, brush your roller using a lint-free cloth and water.
Stage #14:
To take away the wiper blades, pull the actual OEM sealing foam materials away from the wiper edge.
Note: The OEM closing foam material is gooey and is not easily eliminated.
Step #15:
Note: This task is only for the HP 4300. Using a Dremel with a reducing bit, cut away the actual retaining wall that stops the wiper blade from being removed.
Step #16:
Remove the two screws keeping the wiper blade. After that, remove the blade.
Step #17:
dump the waste in the hopper. Clean the hopper by applying dry compressed air or possibly a vacuum.
Step #18:
Apply padding powder to the brand-new wiper blade and place typically the blade onto the spend hopper. Install the two anchoring screws that hold the blade available.
Step #19:
You will need to seal the area throughout the wiper blade using increasing foam along the blade’s edge and the sq holes on the ends.
Action #20:
clean the PCR saddles using a swab along with alcohol.
Step #21:
At this point, you want to apply brand-new conductive grease to the african american contact saddle. Install typically the cleaned PCR.
Step #22:
Apply padding powder on the drum. Slide the travel gear into the bearing link.
Step #23:
install typically the contact end plate.
Be aware: Make sure the contact menu sits flush with the finish of the waste hopper.
Stage #24:
install the mess that holds the contact plate ready.
Step #25:
Place the waste hopper aside within a protected area out of the lighting.
Step #26:
Remove the actual mag roller drive equipment housing from the end of the toner hopper. Then eliminate the mag roller generates.
Step #27:
Remove the actual screw that holds the mag-spinning end plate.
Step #28:
Using needle nose giant pliers, remove the hinge flag from the mag roller finish plate.
Step #29:
Remove the mag roller pressure spring.
Step #30:
Pull the mag roller finish plate from the toner hopper.
Note: Do not lose the actual bearing within the mag roller end dish.
Step #31:
Lift the actual free end of the magazine roller, sliding the spinning out of the mag roller finish plate on the opposite part of the toner hopper.
Notice: Do not lose the having that sits inside the magazine roller end plate.
Stage #32:
Remove the magazine roller bearings from the very end of the roller. Clean your mag roller using dry-out compressed air or cleaner, then use a lint cost-free cloth and a mag spinning cleaner. Clean the mag-spinning bearings and use a paper bits free material.
Step #33:
Remove the two screws keeping the doctor’s blade.
Step #34:
Lift the plastic scrapers and mylar shims off every end of the doctor’s edge.
Step #35:
Lift the physician blade from the toner hopper. If you plan on using the physician blade again, clean the physician blade using dry compacted air or a vacuum, and then use a lint-free towel and alcohol.
Step #36:
Dump the old toner from the toner hopper. Using dried-out compressed air or a vacuum cleaner, clean out the hopper.
Stage #37:
Fill the toner hopper with the correct volume of toner depending on the cartridge variety you are building.
Step #38:
oPlace the new or cleansed doctor blade onto typically the toner hopper. Place the mylar shims and the plastic scrapers on each end of the medical professional blade. Install the two anchoring screws holding the blade available.
Step #39:
slide typically the black mag roller showing onto the contract conclusion and the white bearing upon the drive gear conclusion of the mag roller. Fall the mag roller speak to hub into the mag spinning bearing plate on the toner hopper.
Step #40:
align the mag roller showing the end plate to the toner hopper and slide the conclusion plate onto the.
Step #41:
install the mag roller anxiety spring and the screw in the mag roller bearing conclusion plate.
Step #42:
install the hinge pin in the mag roller bearing menu.
Step #43:
slide typically, the mag roller drives upon the mag roller.
Be aware: Make sure the two injection-creating points on the mag-spinning drive gear face externally.
Step #44:
oPlace typically the mag roller drive products housing onto the end on the mag roller, making sure typically the keyed end of the magnetic field fits into the gear housing.
Action #45:
Using a 3/32 drill bit, drill an opening next to the toner realizing contact on the cartridge speaks to the end cap.
Step #46:
join the toner hopper and waste hopper with each other. Place the cartridge gear real estate end cap onto the part of the cartridge. Install the four actual screws that hold the finish cap in place.
Step #47:
Place the contact finish cap onto the end of the cartridge. Install the two anchoring screws that hold the end cap in position.
Step #48:
You will need to lock the get-in-touch with the end cap. To get this done, drill a 1/16 pit through the contact end cover and the toner sensor bar positioning post. The opening needs to be drilled approximately 1/8 from the end of the toner hopper and 1/8 through the end of the sloped area on the contact end cover.
Step #49:
Now, purchase a 1/16 spring pin in the hole drilled in the bottom level of the contact end hat.
Step #50:
install typically the keyed end of the carol shutter bar into the products housing end cap.
Action #51:
install the non-keyed end of the drum shutter release bar into the contact conclusion cap.
Step #52:
slide the drum shutter hand onto the positioning posting. Push the drum shutter release arm into the drum shutter release. Gently slide and start the shutter to engage the stress spring.
Step #53a:
repay are almost done. Area one probe of an Ohmmeter on the toner sensor speaks to and places the other probe to the hole drilled beside the contact. Locate the particular sensor bar from the toner hopper from the hole drilled in the end limit, ensuring you have a low level of resistance connection.
Note: If the make contact is not made between the sensor bar and the
contact around the end plate, this will bring about an error “54. 1 Get rid of Sealing Tape” or when contact is lost in the course of usage, a premature toner low can occur.
Step #53b:
Test the cartridge.
Well done, you have completed how to remanufacture your own HOURSE POWER 4200/4300 series LaserJet toner cartridges.
Good luck, and complete each cartridge as if it was your last. This information is provided to you for equally educational use and to increase your knowledge in the technical location within the remanufacturing industry.
Inside description of, Joseph Ramo is known as a Motivational Online marketer. He specializes in current scientific studies on ink cartridges and they connect within the exhaustible industry.
Read also: How To Clean Battery Terminals