You walk outside to get into your car because it’s another working day. When you approach your vehicle, you realize that something is incorrect. An individual walks around to the other side, and there it is. Flat fatigue. A feeling of dread envelops an individual.
Or how about this scenario? Most likely driving along enjoying the particular tunes, you suddenly feel something pulling on the tire as if one of your rims is going through deep yellow sand or mud. No matter how significantly you try to steer in the opposite direction, the vehicle brings and pulls until you should be in your lane. Time to take over.
Both scenarios previously mentioned stink! The first one is a significant inconvenience. You could not anticipate dealing with car concerns this morning, and now you’ll be late for work. The following scenario is just plain terrifying! I’ve certainly experienced the two, and I’ll bet, should you have too.
Do you know how to alter a flat tire? Sure, everyone should know how to change a flat exhaust, right? One would think that it can be simple enough and therefore common knowledge, although, like common sense, that know-how is not so common. Learning to change a flat tire is essential. I think it should be tutored to every high school student in driver’s education class, along with the concepts appearing for the official driver’s license test, which is just my two pence.
Every vehicle comes from the software creator with a contingency plan for often the inevitable flat tire affair. Your vehicle has a jack, tools such as tire iron bars or wrench, a complete measurement spare tire, and a minuscule or “donut” limited mi. Tire, no light, or perhaps jack because it has run-flat tires. If fitted with run-flats, the tire inflation tracking system will let you know if fatigue has lost pressure. In this scenario, proceed as swiftly as possible to a tire vendor for repair. If you do not have run-flat tires and the probability you don’t, please follow the methods below.
The procedure for transforming a flat tire can be divided into the following eight basic steps: Get to safety, Check and have the equipment, Stabilize the vehicle, Jacking the car, Remove the smooth tire, Installing the free tire, Lowering the vehicle, and also Cleaning up the work area. Why don’t you look at these steps in greater detail?
Table of Contents
Can Safety
If your vehicle is parked at home, it is possibly already in a safe place for you to work. By “safe location,” I mean an area with limited vehicular traffic. If the tire “incident” occurred although driving, turn on your threat lights and pull more than as far as possible on the road’s shoulder. Ensure you are not crowded to a ditch or a “soft” shoulder. The area should be company enough to support a raised automobile on a jack.
Just a short diversion about your flat wheel. Drive as little as possible onto it. As tires are not made to be driven without airflow, the further a person goes on it, the greater the probability that you will ruin the actual tire and it will need changing.
Check and get equipment.
Notice: Check your equipment and extra tire before you require them.
Examine your wheel-changing equipment. Find the area of your jack, spare wheel, and tools. These things will most likely be found in your trunk area, underneath the floorboard. If you do not locate them there, consult your customer’s manual for the location. The jack may be underneath the seat, the wrench might be under the hood, or the jack port may have its compartment inside the vehicle.
Sometimes the actual parts are scattered all through. As an example, my 1997 Frd Expedition has the jack as well as a wrench in their area inside at the rear of the traveler area, the spare wheel lowering iron is underneath the hood above the radiator, and also the spare tire is on the exterior, underneath the rear, just before the actual bumper.
Remove any products needed to gain access to these elements. Check the spare tire for proper inflation and find all jacking tools and parts. Remove them all in the vehicle. For trucks and SUVs, you will probably have to use a crank and cable access through a hole from the rear bumper to lower the spare tire.
Another is to be aware on safety. If you have path flares, and you should, deploy a single road flare about a hundred ft from the back of your car or truck and another one at 190 ft if you are located on the area of the highway or path. This will let other owners know that your vehicle cannot function well.
Stabilize the vehicle
The next step is for you to stabilize your vehicle. The purpose of it is to prevent the vehicle from moving even though it is being jacked. Most modern motor vehicles come with a wheel chock which should be placed underneath the opposing front side or rear wheel. The actual wheel chock is the wedge. If you do not have a steering wheel chock, find a large rock or piece of wood to wedge under the wheel.
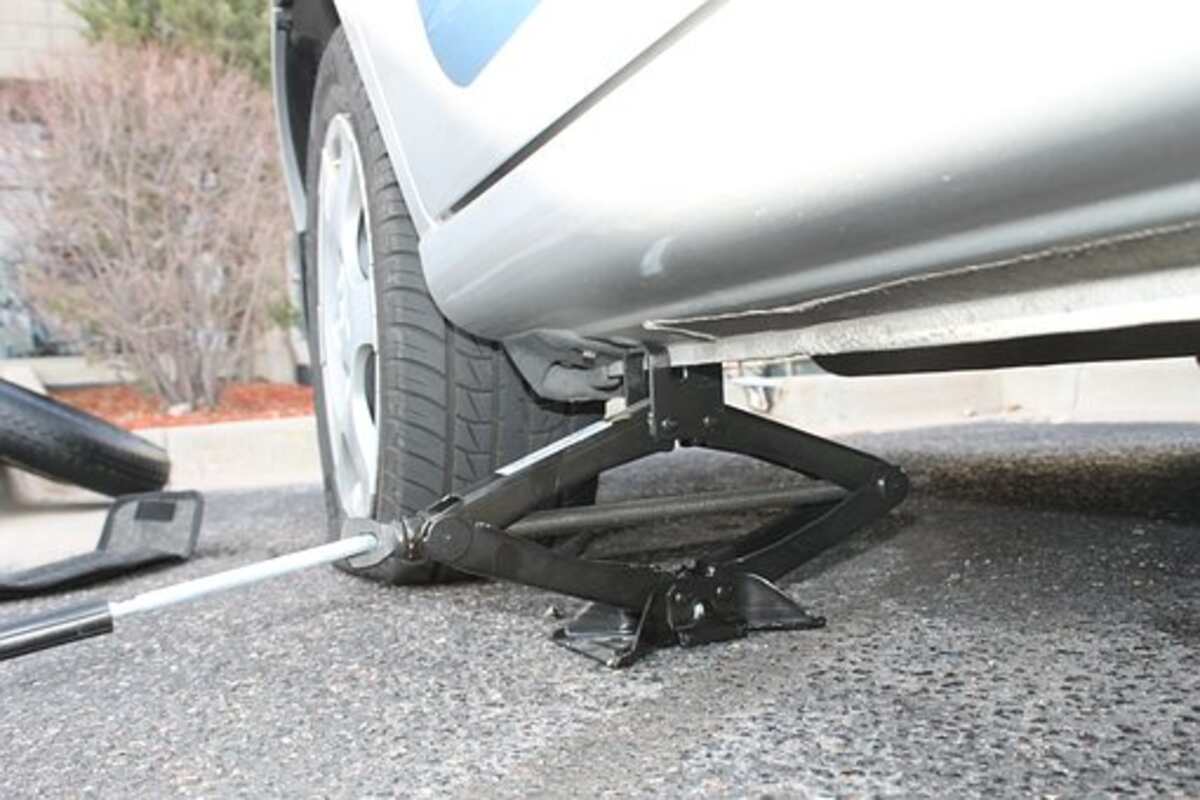
Jacking vehicle
Just before jacking the car, use your tire iron or crowbar to release the wheel’s lug nut products or bolts slightly. It would be best if you did this now because once the wheel is off the ground, it may be difficult to loosen them since the wheel will spin whenever you try. Be sure to seek advice from your owner’s manual about proper jack usage.
Placed the jack underneath a framework rail or at the specified jacking point. Jacking factors are typically indicated by indentions underneath the doors. They may possess rubber supports or gaps where you can insert the jack’s hook if it has 1. Place the jack foot on solid ground for assistance. Turn or crank typically the jack’s handle to raise your vehicle. Raise the car high enough never only to remove the wheel while using a flat tire but also so high for the installation of the entirely inflated spare. Please do not bring it up any higher.
Taking away flat tire
Hold the tire with one hand when loosening the lug almonds with the wrench or crowbar in the other. You will have five lug nuts to remove. Place lug nuts in a harmless position. Most lug almonds are nuts that attach to the wheel link bolts. Other lug almonds are bolts that screw into holes from the wheel hub. The former is easier to use while installing the spare typically.
Installing spare car tire
Lift the spare car tire and install it about the wheel lugs. If your carry nuts are lug products, you must support the tire to line up the hole in the tire hub to insert the initial bolt. This can be a little complicated. Make sure you don’t cross-thread the bolts typically. If the bolt starts to screw in but becomes hard to turn, you’re almost certainly cross-threading. If so, back typically the bolt out and start yet again. Start each lug or even bolt but don’t tighten any.
You need to tighten up the bolts in a “star” pattern. Start almost all 4 or 5 bolts by hand-tightening them to do this. Now, using your haul wrench or crowbar, tighten up the bolt at noon. Next, tighten up the bolt at 6 or 7 o’clock, depending on how many nuts/bolts you have. Then tighten the actual nut/bolt at 3 o’clock, then 9 o’clock, and make a celebrity pattern, tightening each lug/bolt a little more, working your way 24 / 7 until all the nuts/bolts tend to be fully drawn.
This is to ensure the wheel rests evenly on the wheel center so that it turns smoothly without any vibration or wobble. This is important.
Lowering the vehicle
Once the extra tire is appropriately set up, use the jack to lower the vehicle back on the floor gradually. Ensure there is nothing underneath the increased wheel, particularly body parts.
Taking care of the work area
Now that you might have changed the flat car tire, it’s time to pick up everything. Place the wheel with the level tire back in the trunk or wherever you typically removed the spare. For passenger trucks and SUVs, attach typically the tire to the cable process and crank it to make it underneath the vehicle.
Obtain your jack, cranking biceps and triceps, lug wrench, wheel chock, and any other parts, and adequately stow them. When you deploy road flares, slide them out if they are still used.
That’s it! You’re accomplished. Proceed to the nearest mechanic or maybe tire retailer so that they can resolve or replace the flat car tire. Do this as soon as possible because you lack another spare in case of another flat tire. Again, look at spare tires and jacking equipment to ensure they are all set in the train for that inevitable dull car tire event.
Knowing tips on changing a flat tire will soon eliminate potentially harmful situations. Situations like deadly highways or even more dangerous communities. Nobody likes to be susceptible, and the quicker you can get back to your vehicle and on your way, the better off you will be. You may even arrive at work on time!
To get more assistance and to save money on automotive maintenance, download my free duplicate of The Garage Insider, The very best ten things your auto technician doesn’t want you to realize that can save you Thousand$!
Courtney Evans is the Author of the premier weekly e-newsletter for the DIY Mechanic.
Read also: Necessitie Tools When Towing