How to properly care for and also oil wooden worktops.
To obtain the that you oil wooden worktops immediately after delivery, certainly within just 24 hours. Worktops are not just like flooring, and must not be kept to ‘acclimatize’. Worktops must be kept in warm and dry surroundings at all times. Storing them in a carport is a definite no simply no!
Wooden worktops need at least 6 coats of acrylic on both sides prior to installment. I recommend you do it like this;
Provide wooden worktops a final conclude sanding (although they are available sanded, they still demand a final going over with a small paper). Start with one hundred and fifty grit and sand decrease the whole surface and unwrap the edges. Then repeat having 180 grit. Always do the job sandpaper along the almond, otherwise, scratches will show. That final preparation is important, simply because it will define how the worktop will look and feel down the road. You can use electric sanders in this, or do it by hand.
An individual will be happy with the sanding, you need to oil. Try and try this in a warm environment in any other case the oil will be sluggish to dry. Make sure the floor will be covered as oil may drip from the underside, and also wear old clothes after the oil is on outfits it will go hard in addition to spoiling them. It is important to acrylic the worktops on both tips at the same sitting to keep often the worktop in balance.
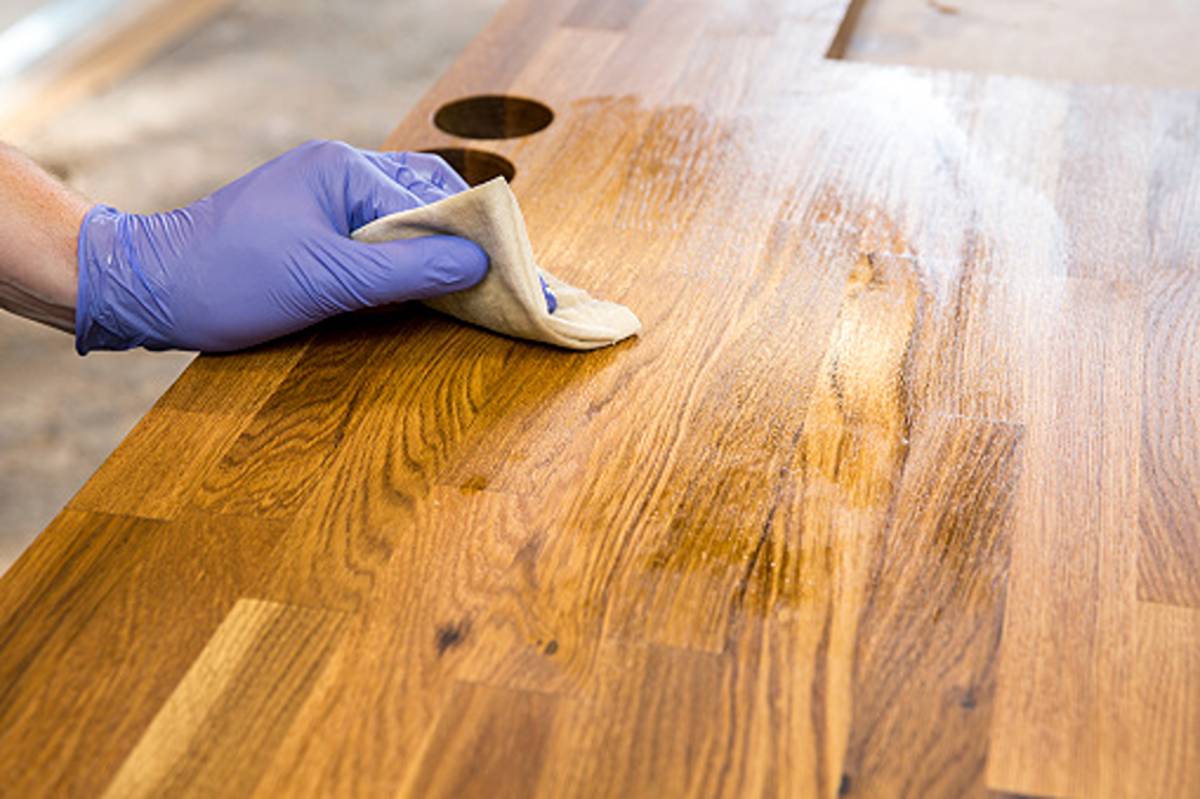
Transform the wooden worktop making it face down. Put a couple of oil on to a worthless, and oil all the unwrapped edges first. If you don’t accomplish this, then any drip represents will show later on. Once the is bordered by have all been oiled, you need to do the first coat. Fit plenty of oil on the bottom of the worktop, and do the job around. Don’t fit so much on that it is costly or runs. Once you have taken care of the underside, turn the timber worktop over immediately. Much oil may run off at this moment hence the reason for the floor is the money to meet and old clothes. Manage the cloth around the many edges again, this time which has a little more oil.
You are subsequently ready to oil the top. It is advisable to cover the whole top, nevertheless without excess don’t have the idea of pooling. Work it all around for a few minutes, then cease working for a cup of tea. Come back throughout 15 – 20 short minutes, and with fresh clean material, wipe off the excess. At this point, it is important to allow oil for you to penetrate the wooden worktop, leaving a thin layer on top. Be sure to wipe the edges off as well to avoid drip grades.
You then need to leave the actual wooden worktops to dry. Based on how warm the room is actually, this can take as little as half an hour (since the wood requires so much in), however, you are tempted to jump on this and oil it once again until it has felt dried out for at least a couple of hours. The reason is that essential oil doesn’t just dry, the idea hardens as well. You can olive oil it again quickly when you really have to, but then it will take very much much longer to harden. The subsequent coat is similar to the last genuinely, except you don’t have to worry about doing the work edges first this time.
Through all of this, the end grain calls for special attention as it absorbs considerably more oil than the surface. Many of us recommend you oil the conclusion grain twice as often (you will find in the beginning it will get absorbed like a sponge anyway) and if you can oil this every time you walk past, simply not leaving any excess to get.
Leave this to dry once again except this time it will take just a little longer. Again, once correctly dry i. e. one or two hours after it felt dried out you will need to denib the top from the wooden worktops. All this indicates is that the worktop needs mild sanding by hand. Do not make use of a machine or you will take away the oil you have just worn. Use 180 grit with this first sanding.
What you are seeking to do is just smooth the top the two coats of olive oil you have already applied should have raised the grain quite slightly, making it feel a bit rough. This is entirely typical and to be expected. It is just that the timber reacts with the olive oil. Do not bother doing this for you to the underside, except for the areas exactly where it overhangs the devices, and again don’t forget typically the edges.
Oil it yet again as before. One smaller point is never to leave typically the worktop face down as soon as the face is at all soaked. You can do it for a few occasions if you have to, as long as you turn it goes back over as soon as possible, and then wipe the actual oil again. If you let it stay there, it will mark. Once again it will take a bit longer to dry. Right after another couple of oilings, you will have to rub the work down once again this time we recommend you utilize a 240 grit. Because before, work the fine sandpaper along the grain. About to catch aiming to take a lot away, just to make the wooden worktop smooth.
Once you have at least six coats on, the worktop will be ready for fitting. This can be done before you cut the wood worktops to size if you would like, although be aware that there may be several small tool marks where the runner of the saw or maybe the router may rub (you can minimize this by simply putting on low tack hiding tape). Also, any fresh new cut areas will need re-oiling. If you are doing any job yourself, make sure you use quite a sharp tooling.
Once the solid wood worktops have been fitted, they might then need another some coats on the top surface to generate a really good finish. You can use typically the worktop, you just need to be mindful with it at this stage – zero hot mugs, no wine beverage rings, no water, and so forth We recommend an overcoat a day, and if it feels somewhat rough then a gentle hands sand with 240 or even 300 grit. Once you have 12 layers on and they have got gone hard (add an additional 48 hours) you have a correctly functioning worktop.
Read also: Buying An Office Chair Online