It really is no secret that beef brisket is one of the hardest meats in order to cook. If not cooked correctly, a brisket will make you very disappointed and your cardiovascular system broken. It is sort of similar to dating a high maintenance girl, if you do not give it the proper consideration, you will be left high along with dry, or tough along with dry in the brisket’s event. Careful steps must be consumed, from the selection of the brisket all the way to the slicing, to make certain a piece of beef that you can truly sink your teeth into. I am going to give you 12 steps that I use myself that ensure a moist, tender brisket every time.
Table of Contents
Step 1: Meat Choice
This is an important step and is difficult to learn. First, you have to look for a whole, untrimmed brisket. It should include the flat, the idea, and it should still have lots of fat still attached. This kind of packaging is usually referred to as the “packer” because this is the method that came from the meats packer to the market. The next matter to look for is a nice darkish pink or cherry colouring in the flesh. Try to avoid some sort of brisket that is covered using grey flesh. Sometimes it is challenging to avoid buying meat that is not a bit grey around the edges. If this sounds all you can find, then this is usually acceptable, just be sure to trim over grey meat before preparing food. While checking out the colour, likewise look at the marbling of extra fat that runs through the beef, you want a good even marbled. This helps ensure a moister brisket. After looking at the actual meat, flip the brisket over to the fat side, also referred to as the fat cap. There should be lots of fat on this side. Body fat should also be more white compared to yellow. Yellow is a signal that it has been frozen, it includes also been said that yellow reveals a grass-fed cow which has a tougher texture. Upcoming, look for a thick flat. Otherwise sure what a flat or possibly a point is, then seek information, just Google it. Since we have covered what a great brisket looks like, let us discuss grades and brands. We try to look for a choice grade brisket if possible. The choice is second in order to prime, but it is hard to discover prime briskets and I heard that the difference is not worthy of the extra cost. If you can only locate a select brisket, then you will still create a great brisket. I possess a technique that helps turn reduced cuts of brisket straight into works of art. As for brands, Authorized Angus Beef also referred to as TAXI, is one of the best. A TAXI brisket is not necessary, however, their meat is said to be towards the top of the grade scale, if you buy a CAB Choice, then you can certainly rest assured that you are finding a top-quality choice brisket but not a low, almost select, alternative.
Step 2: Aging the Brisket
This step is optional, nevertheless, I feel that it helps the pain of the brisket. You need to have some sort of brisket that is still within the original cryovac packaging. All you need to do is place it in the refrigerator at 32 in order to 34 degrees. Some people will certainly age their brisket for approximately 60 days after the group date, but the normal is actually 2 to 3 weeks. The packing day comes on the box that the briskets come in from the meatpacker. You will have to ask the grocer if he or she knows the pack day. If not, then just grow older until the “sell by” date or even a week immediately after. Please do your own exploration of aging meat so that you can not become ill by not doing it properly.
Step3: Trimming the Brisket
The first thing that I do when cutting off a brisket is get rid of as much fat as possible from your side that does not have the excess fat cap. Some people do not work with this step, but I do nothing like a lot of fat on my pieces of brisket. If you like “to chew the fat” in that case leave this fat solely. If there is not a lot of fat, webpage for myself leave it alone because much of this will render off throughout smoking. Next, I begin trimming away at the body fat vein that separates the actual flat from the point. I actually do not want to separate the two muscle tissue, but I want to get the extra fat off as you can because it will not render along all the way. After I am by way of with the fat vein, My spouse and I start trimming up the extra fat cap. I only need a 1/8″ to 1/4″ extra fat cap; this is plenty intended for keeping the brisket moist. In addition, I trim the fat from the sides with regards to 1/8″ to 1/4″. Very last, but not least, I will credit score the fat cap to allow spices and smoke to pass through into the meat. I usually credit score the fat on a 1″ by 1″ grid pattern. This too helps out if you plan in order to inject the brisket.
Step 4: Injecting the Brisket
This task is mainly for flavour. Because brisket is so big, marinades do not penetrate the centre of the meat. Many people do not bother with marinades due to this reason. I started adding my briskets to add some extra flavour. Don’t get me incorrect, brisket is fine the way it really is. This step just amplifies typically the beef flavor. I usually start mixing up the following recipe then I let the liquid amazing before injecting the brisket. Once cooled, I provide the brisket using the 1″ pattern. I inject where two lines cross. In addition, I inject where there is no extra fat. Remember to pull the syringe out slowly as you force down the plunger for you to inject the liquid. When I let the brisket set quickly or for up to 2 nights.
Injecting Liquid
4 Glasses Beef broth
1 Bundle of Au Jus Gravy Mix
1/4 Cup Coconut Sauce
1/4 cup Worcestershire Sauce
2 Tbsp Very hot Sauce
Mix the four cups of beef broth and also the Au Jus gravy blend and bring to steam. Then turn off the heat and blend in the rest of the ingredients. Allow the mixture cool before adding.
Step 5: Mustard Slather
Following the brisket has marinated, My spouse and I pat it dry then I usually apply a thin overcoat of mustard before making use of my rub. I just work with whatever I have on hand. That acts as an adhesive for any rub. You will not taste the particular mustard when the brisket is performed, so it does not matter if you utilize cheap, plain mustard or perhaps expensive, fancy mustard, it will eventually taste all the same. You could also make use of Worcestershire sauce or a mix of the two. I apply the particular mustard to both sides of the brisket before applying the particular rub.
Step 6: Apply the particular Rub to the Brisket
As soon as the mustard has been applied I actually sprinkle the rub above both sides of the brisket in addition to patting it (not basically rub it) onto often the meat. The amount of rub you use should depend on its content. Most brisket rubs have paprika as the key ingredient so it is recommended to put on this type of rub heavily
Brisket Rub
4 Tbsp Paprika
2 1/2 Tbsp It
2 Tbsp Turbinado carbohydrates (Sugar in the Raw) as well as Brown Sugar
2 Tbsp Soup Powder
2 Tbsp Granulated Garlic Powder
2 Tbsp Onion Powder
2 Tbsp Fresh Course Ground as well as Cracked Black Pepper
3 Tbsp Cumin Powder
3 Tsp Cayenne Pepper
2 Teaspoon Ground Coriander
2 Teaspoon Dried Oregano
Mix each of the ingredients and sprinkle liberally over the brisket.
Step 7: The particular Jaccard Method
If you can only find a select brisket rather than a choice, then this phase will help make up for the less meat. This also pushes the particular rub down into the various meats. The Jaccard is often applied before applying the mustard and rub as well. Immediately after applying the rub, you start with the fat cap up and produce two runs through the various meat with the Jaccard. Then jump over and repeat. After you usually are through with the Jaccard, dust the brisket again together with the rub.
Step 8: Brisket Mop
I usually do not clean the brisket until the stroke has set, creating a very good crust also known as bark. Usually, this takes about 4 hrs. Following 4 hrs, I swiftly lift the lid and also spray or brush the particular brisket. I usually do this every single couple of hours, or back-links I need to open the motorcycle to check on the brisket heat range.
Brisket Mop
1/4 Goblet Beer
1/4 Cup Apple inc Cider Vinegar
That is the item, Simple. I usually pour that into a spray bottle. A sprig bottle is quick and easy, and don’t forget, if you’re looking, you’re not cooking food.
Step 9: Getting the Smoke enthusiast Started
This step will vary according to your smoker. Basically, you’ll want an indirect heat origin. I use a vertical normal water smoker and the water baking pan acts as a heat face shield creating an indirect high temperature. I have also used an offset smoker and you simply build your fire in the smaller firebox. I have started off using the Minion Method for establishing my charcoal and this provides me more time before placing more coals on. In the WSM 22 ½” cigarette smoker, I can just about set this and forget it. This particular smoker can go up to twelve, even 16 hours on a load of charcoal. To offer the Minion Method, you fill up your charcoal chamber ¾ or so full of unlit grilling with charcoal and then dump a masonry starter full of lit grilling with charcoal beside that or if you work with a water smoker, you only scatter the lit coals on top of the unit. I favour using lump charcoal, in case all you have are briquettes, you then should still be alright. Just remember not to ever use lighter fluid. I favour using a charcoal chimney nicely. A chimney starter merely requires a couple of sheets involving newspaper to start. For the light-up flavour, I scatter numerous chunks of smoke solid wood over the lit and unlit charcoal. I prefer hickory or maybe pecan when smoking any brisket, but I have furthermore used apple.
Step10: Smoking the Brisket (Up to 165 Degrees)
I favour smoking my briskets at 250 degrees as opposed to on the lower side, nearer to 200 degrees. I feel that it will help ensure a moister brisket. I also let the temperature rise closer to 300 degrees after the brisket has been wrapped inside the foil. A trick to be able to achieve a better smoke band is to put the brisket in while the smoker temperature will below. Leave the heat range down in the 180 qualification range for about an hour and bring it up to 250 qualifications. It is said that the smoke wedding ring stops forming after the inner surface temperature of the brisket extends to 140 degrees, so the extent that the brisket comes across the heat and smoke previous to it reaches 140 qualifications, the deeper the smoke cigars ring. I usually place an invisible probe thermometer in the brisket while it is cooking to be able to the temperature. After concerning 4 hours, I will commence basting the brisket using a spray bottle or remember to brush. I do this every other hour or so until the brisket’s internal heat reaches 165 degrees.
Take note: I often place the brisket in a disposable pan to be able to catch the drippings later and to add an extra shield against the heat.
step 11: Smoking the Brisket (After it Reaches one hundred sixty-five Degrees)
After it actually reaches 165 degrees, I securely wrap the brisket inside a double layer of aluminium foil. You can pour any cup or two of some form of liquid: drippings from the skillet (if you used one), beer, beef broth, apple company juice, or a combination. We leave the probe thermometer in the brisket when I cover it. When the brisket’s inner temperature reaches 185 levels, I open the evade enough to stick a switch type thermometer into the meats to check for tenderness. Personally, I have tried temperature as a guide: to understand when to foil and then to understand when it is getting close to being completed. After 185 degrees, We pretty much just quit investigating the temperature, I just use feel. If the probe on the thermometer has some resistance, then this brisket is not done. As soon as the probe goes into the brisket as if you were sticking some sort of hot knife into the spread, then the brisket has “given up the ghost” and is accomplished. When do I usually take that brisket and wrap the idea back tightly in the evade and place it in an insulated chilly until time to serve. This may keep the brisket warm until eventually time to eat.
Note: If you choose to ramp up the heat in order to 300 degrees after covering the brisket, then you may wish to let the brisket rest for around 20 minutes under the foil tent before covering and placing it in the chillier. Also, if you would like to make more fat out of the stage and make burnt ends after that separate the point from the toned before wrapping back in evade and place the point back about the smoker or cut the idea into cubes, season with an increase of rub, and place it in a disposable pan with slots poked in it. Then place the pan back in the smoker until it eventually is done to your liking.
Note: Your company take about an hour per single lb up to 1 1/2 time per pound to light up the brisket, depending on the density of your meat, the type of smoking aficionado, and the actual smoker temp.
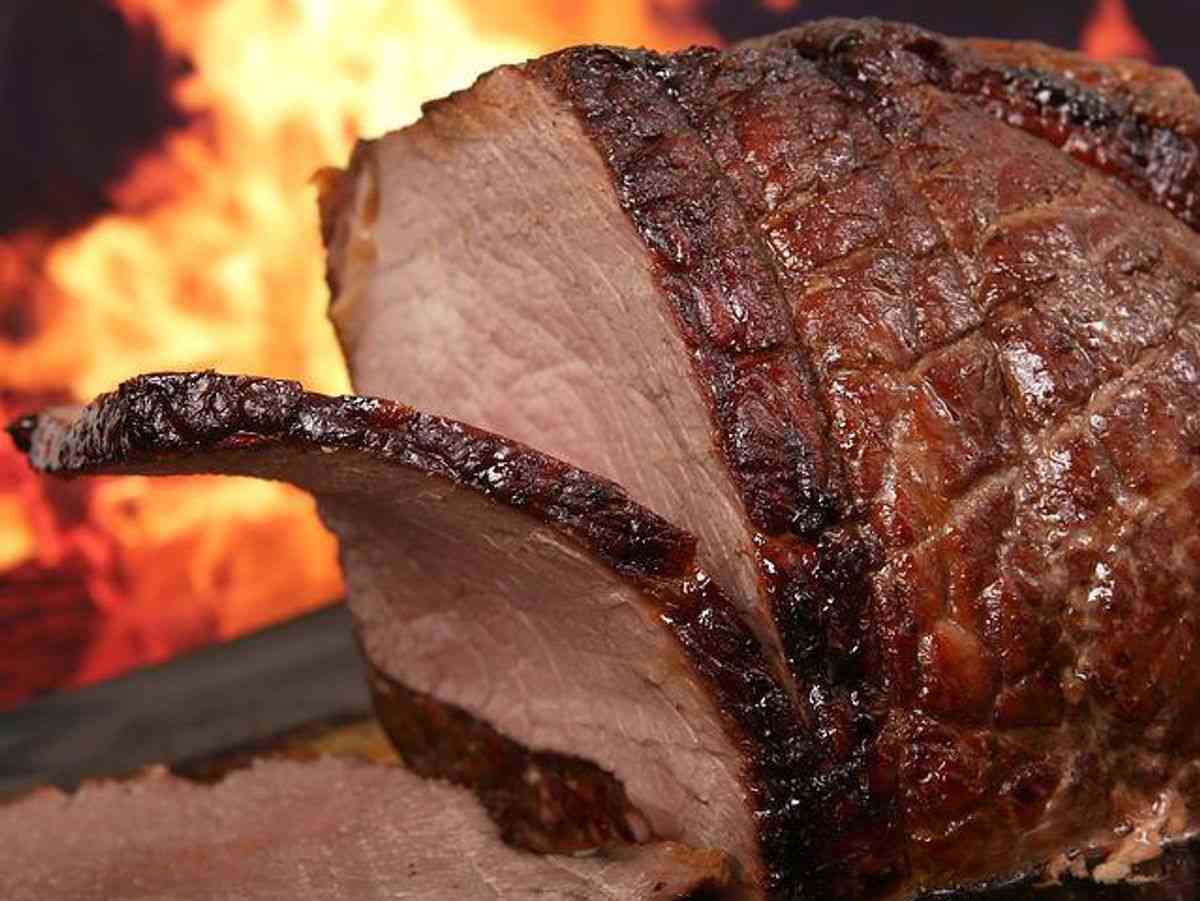
Step 12: Slicing the actual Brisket
About 20 moments before it is time to eat, take the brisket out of the cooler, unwrap it and place it on the large cutting board. Allow the brisket to rest so the inner juices have time to redistribute throughout the meat. The amount of period that is required for resting depends upon how long the brisket has been around the cooler. If the actual brisket has been in the chillier for 4 or more hrs then it does not need long to rest, maybe 5 to10 minutes. If it has merely been in the cooler for approximately 2 or so hours, subsequently 20 minutes should be satisfactory. If you wanted to serve quickly out of the smoker, then I would likely wait 30 minutes before reducing. If I decided not to make burnt off ends and left the actual and flat attached, then the first thing that I want to do is usually separate the point from the level. Once they are separated, subsequently scrape the excess fat through the fat cap and in which the two pieces became a member. Then, I chop the purpose and slice the ripped against the grain with a very distinct knife or an electric chef’s knife. The thickness of the brisket depends on what you like, although keep in mind that the texture of the brisket also dictates how dense it should be sliced. If the brisket is not as tender as you normally like, then portion it thinner. If the brisket turns out very tender, concise of crumbling when you aim to pick it up (some people think of this overcooked while others desire their brisket this way), then slicing it plumper will help it stay along. Also, slicing it a little with the grain will help a great overcooked brisket maintain together.
Well, enjoy! Adhere to these steps and you are recorded your way to creating a brisket that will blow the clothes off your guests and drop them off wanting more. In fact, I am hoping that you like cooking briskets due to the fact everyone is going to be begging one to cook your famous brisket from now on. Bon sult.